In this article, you will learn how to install Anaconda Python Distribution on your Ubuntu 20.04 Server. Anaconda is an open-source that provides package and environment management.
Before you begin installing Anaconda on your instance, make sure that your server is up-to-date by running the following commands :
sudo apt-get update && sudo apt-get dist-upgrade
Requirements
An Ubuntu 20.04 Server
Minimum of 3GB free disk space to download & install
Root access or non-root user with sudo privileges
Download Anaconda
First, you have to download the latest Anaconda installer bash script for Python 3.9 at the Anaconda Downloads page(https://www.anaconda.com/products/individual).
Always check the available versions, in order to verify that you have installed the latest version.
wget https://repo.anaconda.com/archive/Anaconda3-2021.11-Linux-x86_64.sh
Once installation is completed, check the data integrity of the installer by running the following command:
sha256sum Anaconda3-2021.11-Linux-x86_64.sh
Expected output:
fedf9e340039557f7b5e8a8a86affa9d299f5e9820144bd7b92ae9f7ee08ac60 Anaconda3-2021.11-Linux-x86_64.sh
You can also double-check if the above hash is correct by visiting https://docs.anaconda.com/anaconda/install/hashes/lin-3-64/.
Install Anaconda
Run the installation script by running the following command:
sudo bash Anaconda3-2021.11-Linux-x86_64.sh
Expected output:

Follow the instructions and press Enter in order to proceed with the installation.
Then you will be asked to accept the license terms and choose the directory of Anaconda’s installation.
Type yes and press Enter if you agree with the terms, then select your preferred location. You can either press Enter that will choose the default directory or specify a different location by typing the directory of your choice.

The installation process will be completed once you see the below output:

Type yes and press Enter in order to initialize Anaconda.
Expected output:
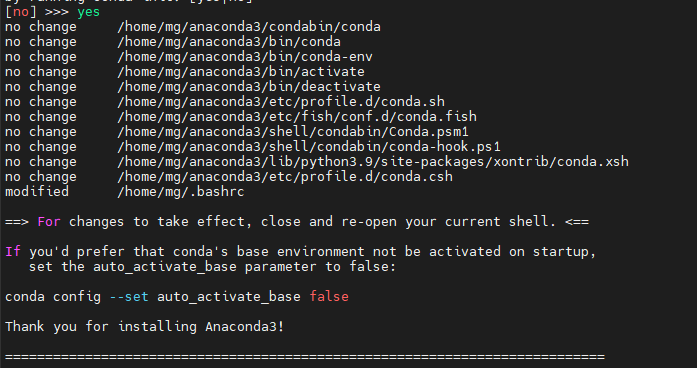
As shown above in order for changes to be made, if there are any, you have to close and reopen your current session.
The next step is to activate the Anaconda environment variable by running the following command:
source ~/.bashrc
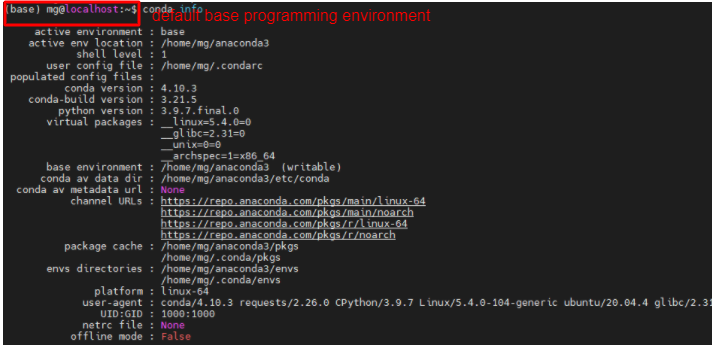
You can verify the installation info by running the following command:
conda info
Expected output:
Create Anaconda Environment
Before creating your Anaconda environment, you can check which versions of Python are available by running the following command:
conda search "^python$"
For example, in this article we will create an environment using the latest version of Python 3 by running the following command:
conda create --name my_env python=3
The output will show you information regarding the packages that will be downloaded as well as which packages will be installed. Press y in order to proceed with the creation of the environment.
After the creation of your environment is completed, you can activate it by running the below command:
conda activate my_env
You can deactivate an active environment by running the below command:
conda deactivate
Now that your environment is activated your command prompt will no longer use the default base programming environment. Instead, your new environment will be shown.
![]()
You may also check the Python version within your environment by running the below command:
python --version
Expected output: Python 3.10.0
You can also create an environment and simultaneously specify the version of Python by running the below command:
conda create -n my_env02 python=3.9
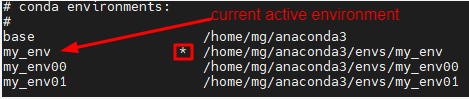
Type the below command to view all the environments you have created.
conda info --envs
Expected output:
If you wish to remove an environment, type the below command:
conda remove –name my_env00 –all
If you want to return to the base programming environment, run the below command:
conda activate base
Update Anaconda
You should update Anaconda on regular bases by running the following commands using the base programming environment:
conda update conda
Press y in order to proceed with the update of conda.
conda update anaconda
Press y in order to proceed with the update of Anaconda distribution.
Uninstall Anaconda
If you wish to uninstall Anaconda you need first to use the anaconda-clean module:
conda install anaconda-clean
Press y in order to proceed with the installation process of the module.
Then you can run the below command.
anaconda-clean
Press y in order to proceed with the uninstallation process or run the below command instead of the above.
anaconda-clean --yes
Expected output:
Backup directory: /home/mg/.anaconda_backup/2022-03-13T012031
Now, you can remove the entire Anaconda directory by running the following command:
rm -rf ~/anaconda3
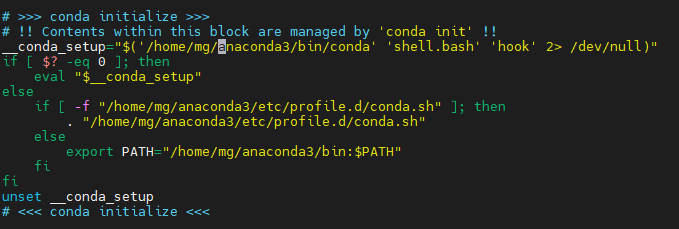
The last step is to remove the pathline from the .bashrc file.
nano ~/.bashrc
Search (CTRL + W) for Anaconda and delete or comment the below section.
The uninstallation process has now been completed.